
This repository will not be actively maintained as I no longer own a DF64 grinder.
This page lists some resources for the DF64/G-iota/Solo/Turin grinder. The DF64 is a single dose grinder at a very affordable price, but it definitely has some shortcomings. The following tweaks or mods will be able to make minor to substantial improvements in grind consistency, workflow and retention.
Contact me at discord @Zell#0815 if you discover anything new to add to the list!
Table of contents:
- 1. Burr alignment
- 2. Reduce retention / prevent clogging
- 3. Reduce Popcorning effect
- 4. Better grind setting indicator
- 5. Other 3D Prints
- 6. Reviews & Others
- 7. Community & Forums
1. Burr alignment
(click to expand)
Tools you need
- Aluminium foil which is as thin as possible, or brass foil. Ideally 0.01 - 0.02mm or thinner.
- Screwdrivers and plier
- Whiteboard marker pen (for checking alignment)
- Permanent marker pen (for marking orientation)
(!) Before you start
- It is best to align before you grind any coffee, so that you don't have to clean the grinder. Else, you need to remove the burrs from the burr carriers (both top and bottom) and thoroughly clean them, including the grind chamber and chute.
- Make sure the grinder's power plug is still off. Now we need to find the best top burr orientations.
- There are 3 rotary orientations of the top burr carrier. Before you start, mark ONE of the top burr carrier anchors/fins with a permanent marker just like in the photo below. This way, you can remember the orientation.

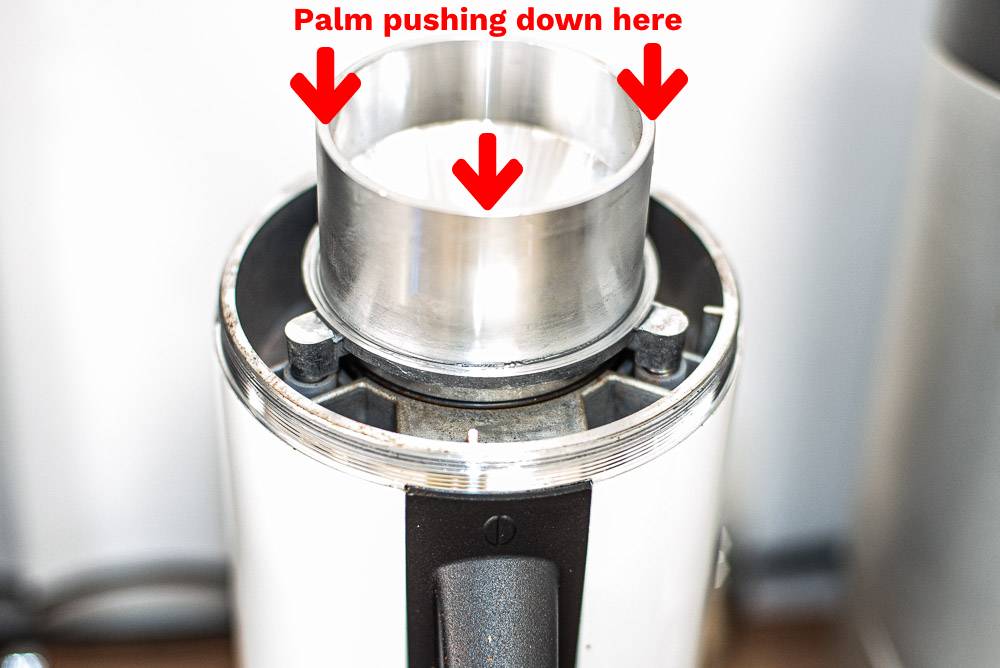
Marking one fin with a permanent marker. - Install the grind adjustment ring. To make it easier, push down hard using your palm while spinning the adjustment ring as depicted below (ring not showing). You can see a demo here at 2:08 of this video.
- Now look for the burrs touching point manually. You can follow this video, use your fingers or a plier to spin the burr nut and hear carefully for the burrs touching sound.
- Try out ALL THREE (3) orientations of the X mark (left/top/right) and hear the burrs touching sound. When it's not aligned, you can hear the burrs touch on and off since the burr is not perfectly level. Your goal here is to look for the most consistent burrs rubbing sound (i.e. the 'non-touching' part is the shortest among the 3 orientations). Note that the burr touching point is not exactly the same in different orientations.
- Once you found the best orientation, remember which direction the X mark is facing (e.g. the top). This is important as you need to assemble the same way after aligning it.
- Now you're ready to check the alignment with a whiteboard marker test. See the next part of the guide.
Checking alignment and shimming
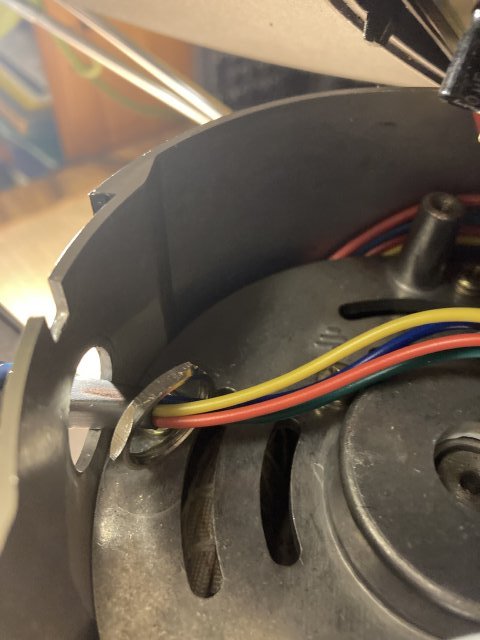
- You will follow the Youtube video guide below, but do take note that the area to 'shim' (i.e. apply the foil) for the top burr is a bit different than other grinders. There are only 3 small areas to put the foil:
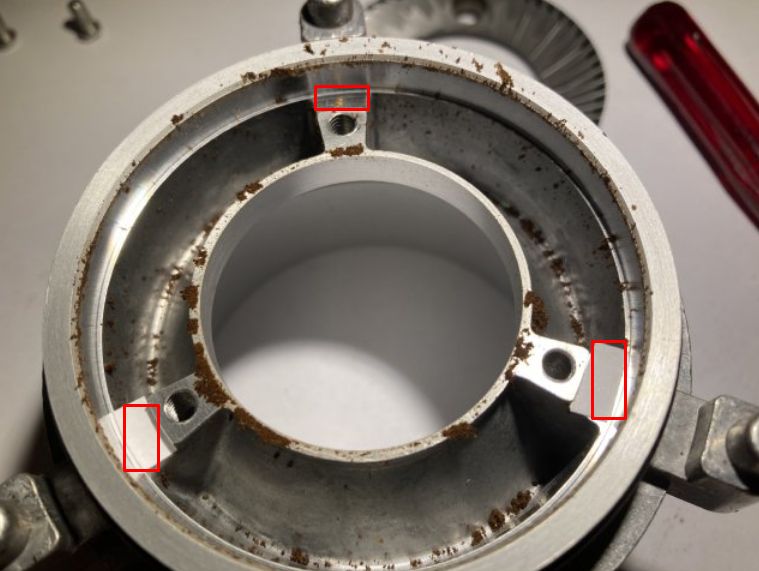
The 3 marked areas are where you can shim the top burr carrier. - Make sure you do not lose the 3 springs supporting the top burr carrier.
- Follow the youtube guide below step by step, note that the step to mark the burrs with the carrier using a permanent marker is absolutely a must. (2:08 to 2:23 in the video). I also recommend to spin the burr using hand / plier during the checking stage rather than spinning the motor. https://www.youtube.com/watch?v=Gb3PgeQ6ewY
- Once you're happy with the alignment, install the burrs back following the initial orientation (remember which direction the red X mark of the top burr carrier was facing).
- Congratulations! You have successfully aligned the DF64.
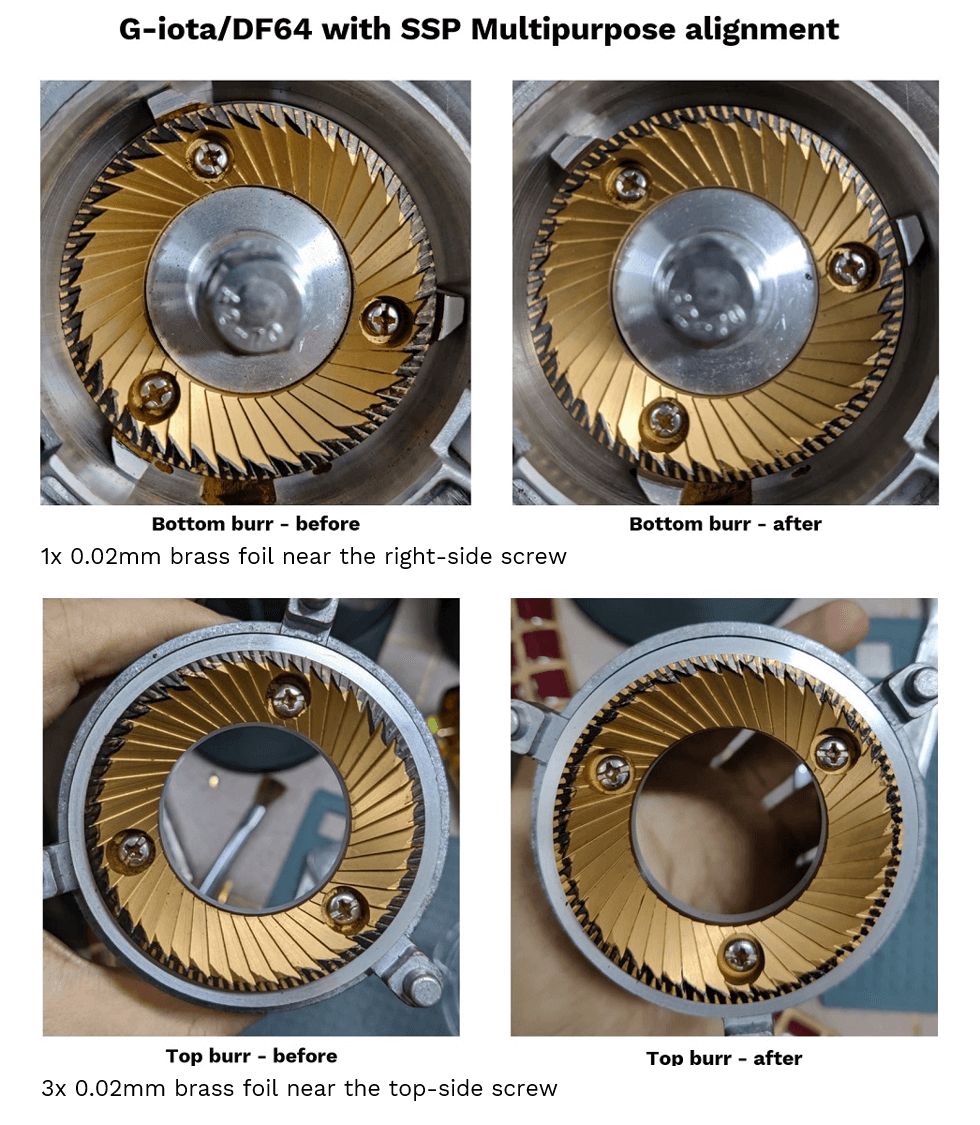
My alignment result - SSP Multipurpose
If you use SSP burrs, they are thicker and hence the burr touching point will be around the 27-30th mark instead of near zero. Below is my alignment result.
2. Reduce retention / prevent clogging
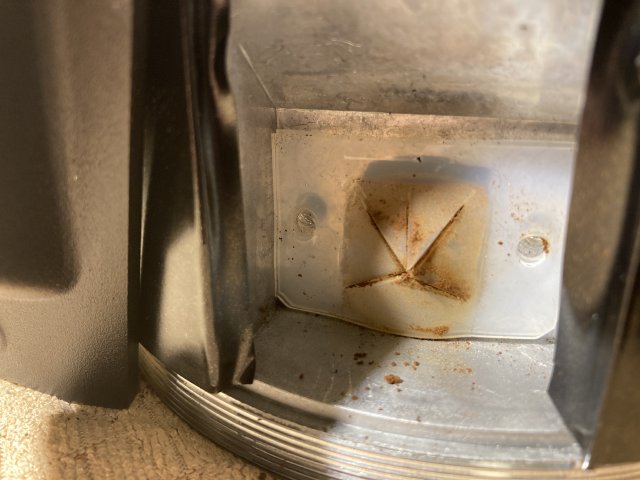
The clump crusher (or flaps) in the DF64 is the culprit for high retention as well as potential clogging at the exit area (click for image). The flaps are 2 thick layers of silicone, which is why you need to pump the bellow very hard and many times to blow the grinds out. Some modifications below can reduce the retention and prevent clogging.
To start, we need to know how to disassemble and access the clump crusher.
Step by step to disassemble with image
- If you prefer video, here is one by Caffe Martella Singapore: https://www.youtube.com/watch?v=WdKTbM7BmGc
- Remove upper burr carrier
- Remove 2 screws from the bottom plate of the mill
- Loosen the nut securing the power-button (from the inner side of the grinder, you will see it after you removed the bottom plate)
- Remove the single screw holding the portafilter bracket in place
- Remove the 2 screws behind the portafilter bracket
- Now you can lift the front plate a little bit and turn it to one side, revealing the plastic chute
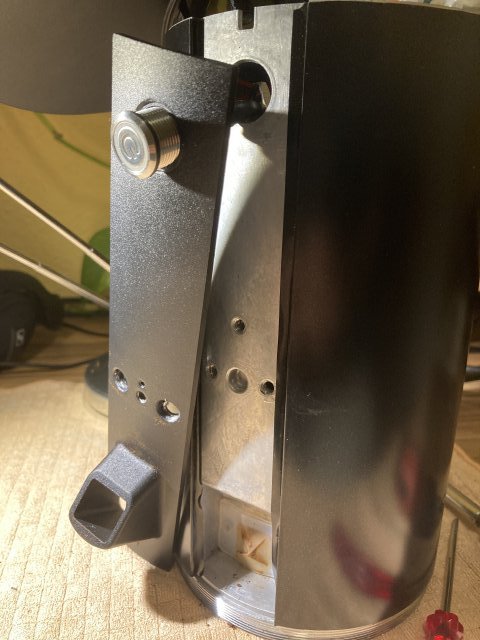
- The plastic chute is attached to the mill with 2 screws, remove them and you have access to the silicone flappers.
- (This is for Method 2 or 3 below) When putting things back together, take the utmost care not to drill in the screws holding the chute and flapper in place too far - they will then reach into the grinding chamber and block the burrs and potential cause big damage to the mill. You can use some washers at the screw or reuse the original silicone flaps (only cut out a hole).
- Make sure the front plate is flush especially on the top (near the adjustment ring thread) after reassembling as shown below.
The actual mods (from best to worst):
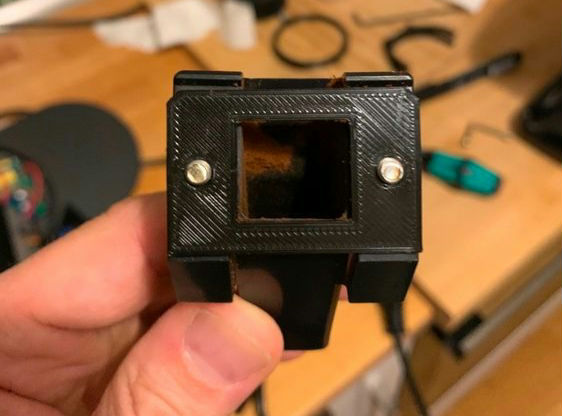
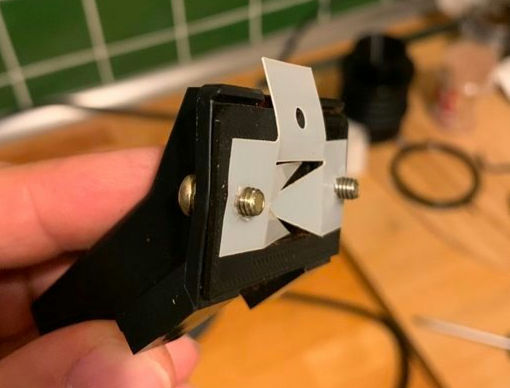
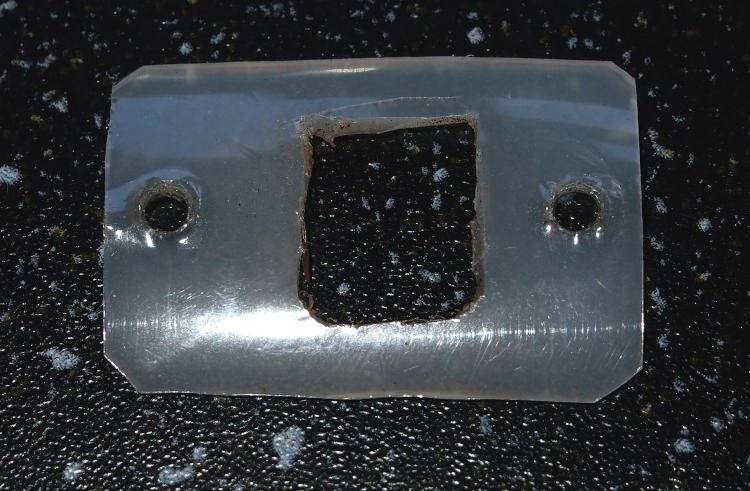
(recommended!) Method #1 - Transparent PVC cut out + 3D adapter (3D print)
- Download and 3D print the adapter by Ben-030 : adapter without any pattern in the middle. If you don't have access to 3D printer or 3D printing service, you can cut a hole in the middle of the original silicone clump crusher instead.
- The declumper v2.0 by CY is no longer recommended - the grid pattern in the middle will deform/melt if you grind a lot consecutively (see here), and the plastic parts will end up in your coffee
- Cut out a piece of transparent PVC (using a plastic folder or face shield material) to complement the 3D printed adapter, following this video:
- Step by step installation guide (first part of the video):
- Video showing the end result: https://www.youtube.com/watch?v=qp49wee7nDc
// sources: CY from Speedy3DCreations, Ben-030
Method #2 - Use a Mythos One clump crusher (need to buy)
- This is the best method, but requires you to buy the Mythos One clump crusher.
- Where to buy: [1 - £6.50] [2 - 7.50 €] [3 - OEM from Taobao, $7] Note: I heard that it costs up to $40 in the US, which is seriously overpriced for a piece of thin cardboard-ish thing like this. I would definitely not spent that much for this. If you have no way to obtain it, you can custom make one using Method #3, you can also make following mythos one's design but it requires more work.
- Video showing the result
- Option A (source) - 3D print an adapter part that fill the gaps that the silicone flaps normally block. Without it, ground coffee will find its way through and will not be transported into the spout. Link to the STL file
- Option B - use the original flap to support. Cut out a hole in the middle of the silicone flaps as large as the chute exit area, and attach the mythos one clump crusher to it similar to Option 1's style.
Method #3 - Make your own clump crusher with cardboard (more work)
- This method is almost as good as the Mythos One clump crusher (I tried myself). It just requires a bit more work to custom make.
- Using a piece of very thin cardboard (thinner than manila card, maybe double of 80gsm A4 paper). The size should be covering most of the chute exit hole but not big enough to get stuck in the chute/spout.
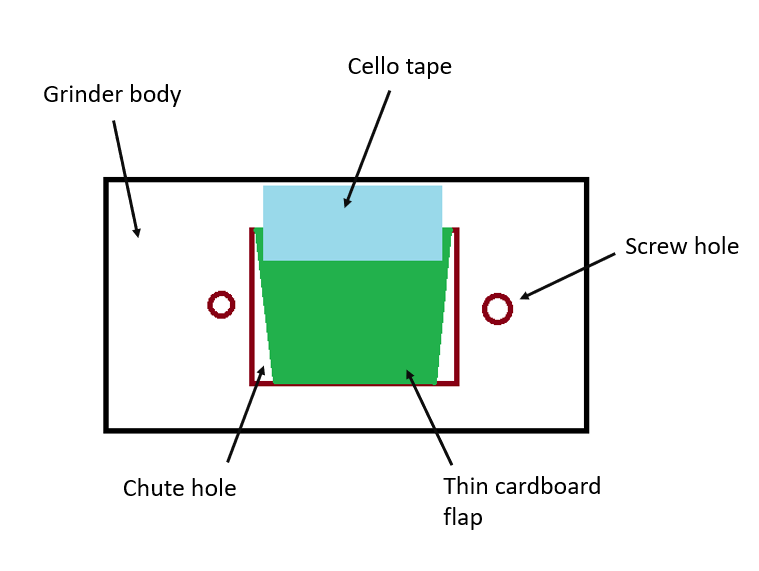
- When assembling the chute, you need the original flap with hole cut out in the middle, or washers at the screw to prevent screws from protruding into the grinding chamber.
- The cardboard should be able to move freely when being lightly pushed from the inside of grinder. To test it, after the chute is assembled, use a thin tool like toothpick to push the cardboard from the grinding chamber and see if the cardboard can move freely and not get stuck.
// idea source: @SheedaPastol from Espresso Aficionados discord
Method #4 - Use only one layer of clump crusher (no extra accessory needed)
- This method is the easiest since you only need the original flaps, but occasionally you might still face a little clogging or spraying grinds.
- Remove the flaps and you will see the 2 layers of silicone flaps are glued to each other.
- Carefully cut an opening as large as the chute exit area, only at the outer layer of the flap (facing yourself). Now the flap only has 1 later of thickness at the exit area.
- Assemble everything back carefully and you're done.
3. Reduce Popcorning effect
Some people are annoying with the beans popcorning in the bellow. It's not an issue for me, but if you want to reduce it, there are 2 implementations below that you can 3D print.
It is attached inside the bottom part of the bellow to reduce the space above the rotating burrs, and the funnel guides the beans into the burrs.
Final Version by Ben-030 (22mm opening) - https://www.thingiverse.com/thing:4906179
Anti Popcorn V3.1 by CY (20mm opening) - https://www.thingiverse.com/thing:4899743
// source: Ben-030 (Designer in Thingiverse)
4. Better grind setting indicator
The default grind indicator is a black coloured bean icon which is very difficult to see. There are a few designs of 3D printed indicators available below. I use the first one.
- https://www.thingiverse.com/thing:4833793
- https://www.thingiverse.com/thing:4869335
- https://www.thingiverse.com/thing:4866360
- https://www.thingiverse.com/thing:4887874
- DF64 Grind Indicator rev2
// source(s): respective designers in Thingiverse; Ben-030
5. Other 3D Prints
- 10 degree tilted base by Caffe Martella Singapore
- 10 degree tilted base - dovetailed split design by jkim_makes
- 3D printed dosing cup/portafilter folder by Ben-030 (nearer to the spout)
- 3D printed bellows lid by Ben-030
- DF64 adjustment ring printing (helpful if you use SSP)
- Stock dosing up raiser/extension by AnthonyTD
- DF64 dosing cup adapter (closer to the chute) by CY
6. Reviews & Others
- DF-64/G-Iota/Solo/Turin Comprehensive Review by DaveC
- In-depth Review by Antoine Vautherot
- DF64 parts diagram (exploded view)